How to clean a diaper pail
This post contains affiliate links. If you buy through them, we may earn a small commission at no extra cost to you.Learn more.
Learning how to clean a diaper pail is really two habits: a quick wipe of the rim and lid every time you change the bag, and a full deep clean every week or two. The whole job of a pail is to hold smell, so cleaning it is less about looking tidy and more about stopping the odor it traps from leaking back into the room. We own both an Ubbi and a Diaper Genie, so this is simply how we keep them fresh, with mild soap, baking soda and vinegar, and nothing harsh around the baby.
One quick note before the steps. A steel pail and a plastic one clean differently, and we will come to why, but the routine below works for either. And whatever cleaner you use, never mix white vinegar with bleach, because the two together give off a dangerous gas.
What you need
Nothing special, and nothing you would not already have under the sink.
- Warm water and a little dish soap
- Baking soda, for scrubbing and for soaking up odor
- White vinegar, for cutting smell and grease
- A cloth or sponge, plus an old toothbrush for the seal and hinges
- A fresh bag or liner for when you are done
Clean the rim and lid every time you empty it
The single habit that keeps a pail from ever getting bad is a ten-second wipe every time you pull the bag. The rim, the underside of the lid, and the trap door are the parts that touch dirty diapers and then sit closed all day breathing that smell back out. A soapy cloth over those surfaces, right as you swap the bag, is what stops odor building where you will notice it most.
Do not skip the underside of the lid. It is out of sight, so it gets forgotten, and it is one of the two spots (the seal is the other) where a pail’s smell actually lives. A quick pass with the same soapy cloth you used on the rim is all it takes, so make it one motion, lid then rim, every time you change the bag. Ten seconds there saves you a much bigger job later.
The deep clean, every week or two
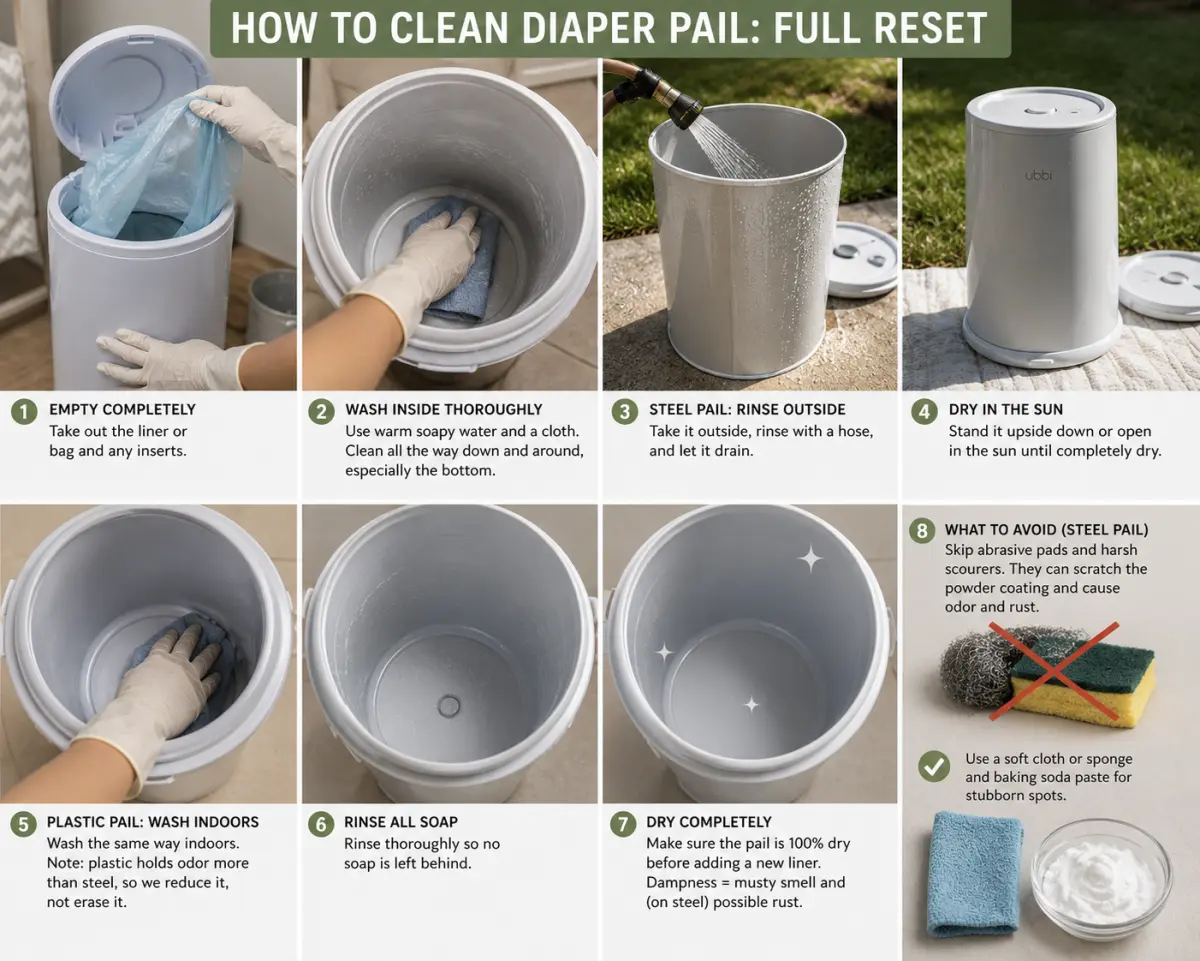
Every week or two, give the whole pail a proper reset. Empty it completely and take the liner or bag out first. Then wash the inside with warm soapy water, working the cloth all the way down and around, because the bottom collects drips and residue that the daily wipe never reaches.
For a steel pail, this is where its main advantage shows: you can carry it outside, rinse it out with a hose, and stand it in the sun to dry. The powder-coated steel does not soak up smell, so a wash and a dry genuinely returns it to fresh. For a plastic pail, do the same wash indoors, but know going in that plastic holds odor in a way steel does not, so the goal is to reduce the smell rather than erase it.
Rinse out all the soap, then dry the pail fully before a new bag goes in. This matters more than people think. A damp pail traps a musty smell of its own on top of the diaper smell, and on steel a bit of standing water at a scratch is where a spot of rust can start. Dry is half the battle.
One thing to avoid on a steel pail: skip the abrasive scouring pads and the harsh scouring powders. The powder coating is what stops the steel absorbing odor and rusting, and a wire pad or a gritty cleaner scratches through it. A soft cloth or sponge, plus the baking soda paste for anything stubborn, cleans just as well without wearing down the surface that keeps the pail fresh.
Killing the smell with baking soda and vinegar
Soap cleans, but baking soda and white vinegar are what actually deodorize, and they are safer around a baby than any heavily scented spray. Use whichever suits the mess.
Baking soda works two ways. Made into a paste with a little water, it is a mild scrub for the inside that lifts residue and takes the smell with it. Left as a dry sprinkle in the bottom of a clean pail, it keeps absorbing odor between changes. Both are worth doing.
White vinegar cuts smell and grease that soap leaves behind. Wipe the inside with a half-and-half mix of vinegar and water, or for a pail that has really turned, let that mix sit in the bottom for ten minutes before you rinse. The vinegar smell fades as it dries and takes a lot of the diaper smell with it. Again, never combine it with bleach.
If the pail has been sitting closed and grim, an hour in direct sunlight after washing does more than it sounds like it should. The sun helps break down lingering odor, which is another reason a steel pail you can carry outside is easier to keep fresh than a plastic one you cannot really move.
Getting into the seal, lid and hinges
This is the diaper-pail version of the crevices problem, and it is where a wash that looks finished can still leave a smell. The rubber seal around the lid, the clamp or trap-door mechanism, and the hinges all pack with residue that a flat cloth slides right over. An old toothbrush with a little soapy water or baking soda paste is the tool here. Work it into the seal groove and around the moving parts, then wipe away what you loosen.
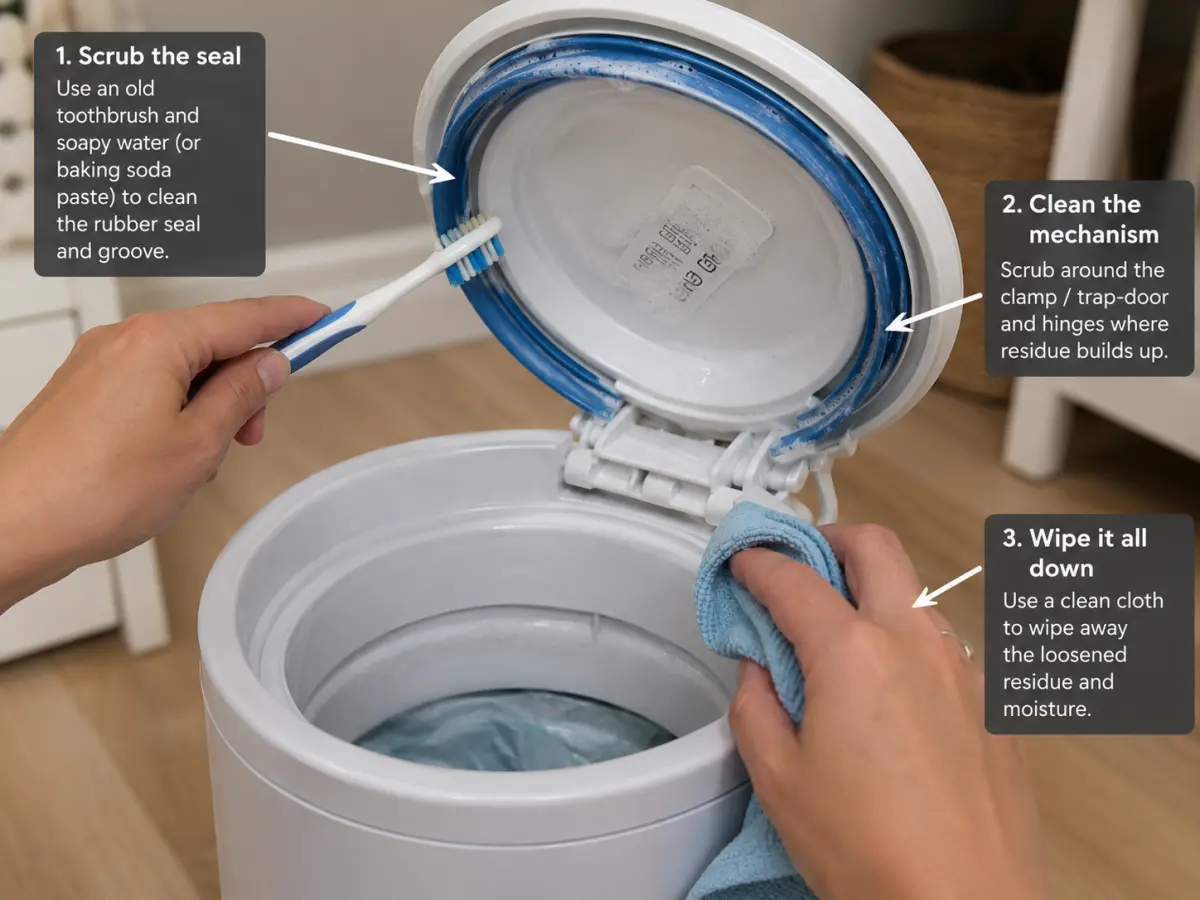
On a Diaper Genie style pail, pay attention to the clamp and the twist mechanism, since that is exactly where it grips and seals each diaper and so exactly where smell concentrates. On the Ubbi, it is the sliding lid track and the rubber seal under it. Either way, five minutes with a toothbrush on these parts does more for the smell than another five minutes wiping the walls you already cleaned.
Steel versus plastic, and why cleaning differs
Since we own both kinds, it is worth being straight about the difference, because it changes how much cleaning even helps. The Ubbi is powder-coated steel, which is non-porous, so it wipes clean and resets to fresh after a wash. The Diaper Genie is plastic, and plastic slowly absorbs odor into the material itself, so over months it can hold a background smell no cleaning fully removes.
That does not make a plastic pail not worth owning, and it comes down to more than cleaning, but it does mean the two ask different things of you. Steel rewards a wash and a dry. Plastic rewards emptying it often so the odor never gets the time to soak in. We go through the full trade-off, including odor control, refill costs and build quality, in Ubbi vs Diaper Genie.
One nuance we have picked up since: not every plastic pail is the same plastic. Our Dekor EKO Classic uses a closed-cell ABS that the manufacturer says does not absorb odor, which is a different claim from an ordinary porous plastic body. It still rewards the same routine, and how it ages is the part we cannot tell you yet. All three of ours are compared in best diaper pail.
Stopping the smell before it starts
The easiest pail to clean is one you never let get bad, and a few habits do most of that work. Empty it on a regular rhythm rather than waiting until it is overfull, because a packed pail smells no matter how clean the walls are. Keep a thin layer of baking soda in the bottom to soak up odor between changes. And do the ten-second rim-and-lid wipe every single time you swap the bag, because that is the habit that keeps the deep clean quick.
None of this needs strong chemicals or scented gadgets. A pail that gets emptied often, wiped at every change, and deep-cleaned every week or two stays as fresh as a diaper pail is ever going to be, which is the honest bar here.
How often, in short
A ten-second wipe of the rim and lid every time you empty it, and a full deep clean every week or two. If it starts to smell between deep cleans, the answer is to empty it more often, not to scrub harder. The routine wipe is the part that matters most, because it is what keeps the whole job small.
The bottom line
Cleaning a diaper pail is easy if you never let it get bad: wipe the rim and lid at every bag change, deep-clean with soap, baking soda and vinegar every week or two, get a toothbrush into the seal and the mechanism, and dry it fully before the next bag. How fresh a pail stays also depends on the pail itself, steel being easier than plastic, which is why we compare them in Ubbi vs Diaper Genie. And if you are still weighing whether you need a pail at all, we make the honest case either way in baby items you don’t need. The other thing in the house that traps diaper smell is the bag you carry, and that one cleans differently, which we cover in how to clean a diaper bag.
Frequently asked questions
How do you clean a diaper pail?
Empty it fully, pull out the liner, then wash the inside with warm water and dish soap. For odor, wipe it down with diluted white vinegar or scrub with a baking soda paste, get into the lid seal and the trap-door mechanism with an old toothbrush, then rinse and dry it completely before a fresh bag goes in. A steel pail can go outside for a rinse and some sun; a plastic one needs more patience because it holds smell.
How do you get the smell out of a diaper pail?
Baking soda and white vinegar do most of the work. Scrub the inside with a baking soda paste, or wipe it with a half-and-half vinegar and water mix and let it sit a few minutes before rinsing. Airing it in direct sunlight helps too. Never mix vinegar with bleach. If a plastic pail still smells after all that, the plastic has absorbed the odor and no amount of cleaning fully removes it.
How often should you clean a diaper pail?
A quick wipe of the rim and lid every time you empty it, and a full deep clean every week or two. The wipe stops odor building on the surfaces you touch, and the deep clean resets the whole pail. If it starts smelling between cleans, that is the sign to empty it more often rather than to clean harder.
Is a steel diaper pail easier to clean than a plastic one?
Yes. A powder-coated steel pail like the Ubbi is non-porous, so it wipes clean and does not soak up odor the way plastic does. Plastic pails hold smell over time no matter how well you clean them. We own both, and the steel one is noticeably easier to keep fresh, which we cover in our Ubbi vs Diaper Genie comparison.