How to clean baby bottles properly
This post contains affiliate links. If you buy through them, we may earn a small commission at no extra cost to you.Learn more.
How to clean baby bottles properly is one of the few questions on this site where we are not the authority, and we are going to say so up front rather than pretend otherwise. The CDC publishes a step by step protocol for cleaning infant feeding items, and it is short, specific and free. That is the guidance to follow. What we can add is the part nobody official writes down: which bottles are quick to wash, which parts cause trouble, and what actually goes wrong at the sink at eleven at night.
So this article is in two halves. The CDC’s steps, stated as theirs. Then our gear notes, stated as ours.
What the CDC actually says
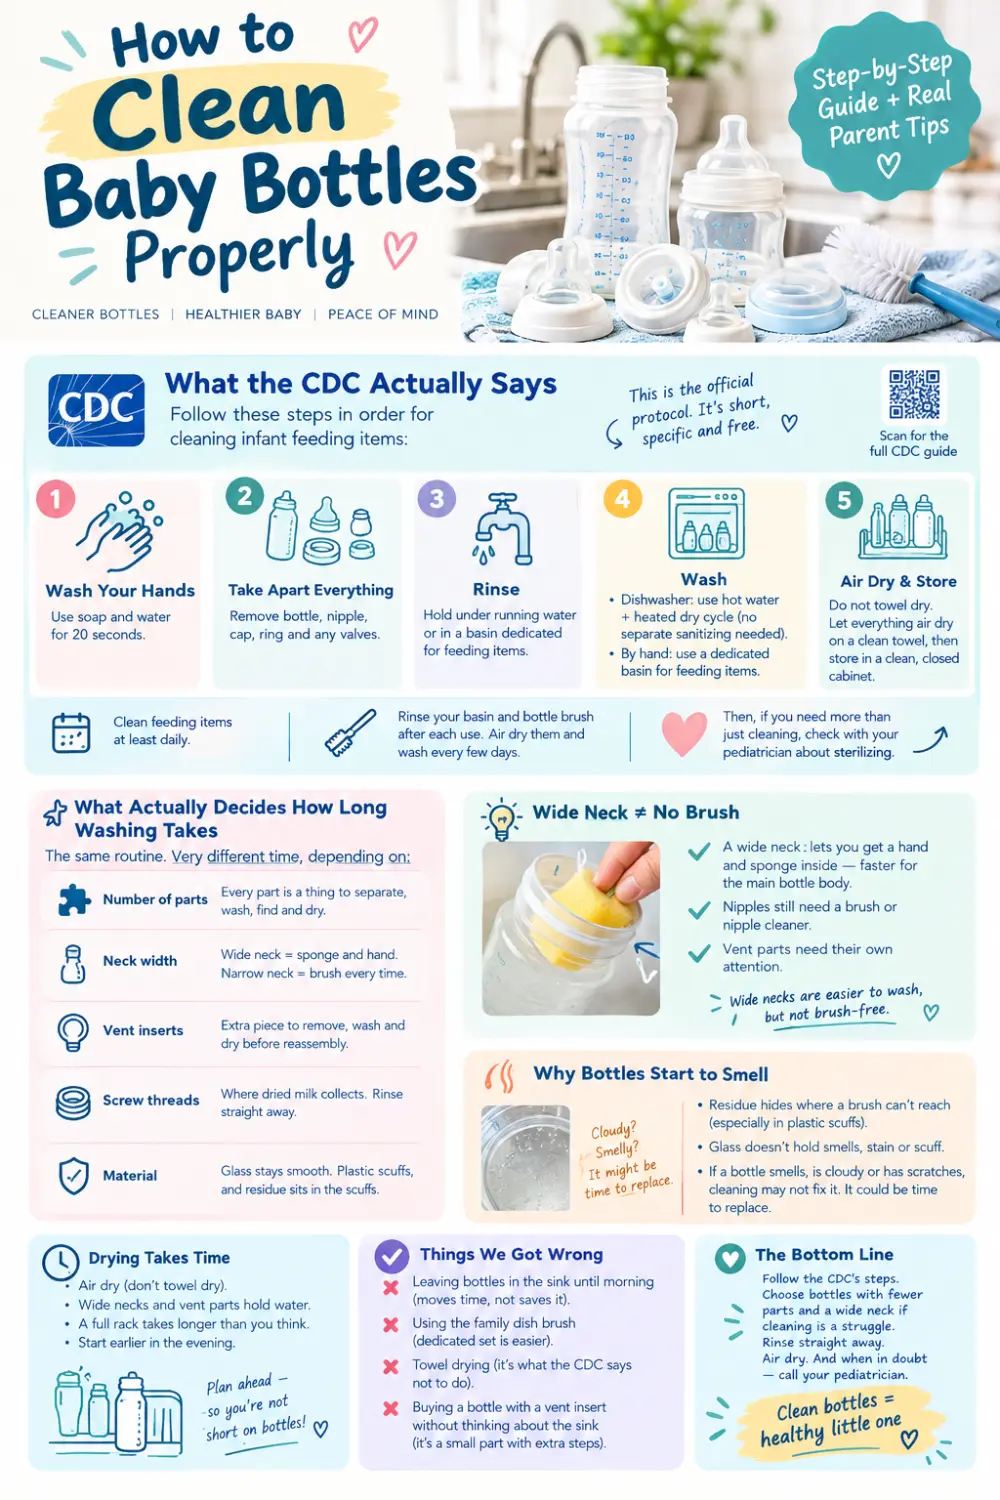
Their protocol for cleaning, in their order:
Wash your hands with soap and water for 20 seconds. Take the bottle completely apart, every piece, which means bottle, nipple, cap, ring and any valves. Rinse the parts by holding them under running water, or fully under fresh water in a basin kept only for feeding items.
Then wash, either way:
In the dishwasher, put the parts in and put small items such as nipples, rings and valves inside a closed-top basket or a mesh laundry bag so they do not end up in the dishwasher filter. If your machine can run hot water and a heated drying cycle, use it, and the CDC notes that a separate sanitizing step is then not necessary. Wash your hands again before taking the clean parts out.
By hand, use the dedicated basin rather than putting anything directly into the sink.
Afterwards, air dry thoroughly. The CDC is specific that you should not rub or pat items dry with a dish towel, because doing so can transfer germs onto the thing you just cleaned. Stand everything on a clean, unused towel or paper towel and leave it. Then store the reassembled bottles in a clean, protected place, such as a closed cabinet used only for clean dishes.
They also say to clean feeding items at least daily, and to rinse your wash basin and bottle brush after each use, air dry them, and wash them every few days.
That is the whole protocol. Whether your particular baby needs more than that, and whether you should be sanitizing as well as cleaning, is covered in how to sterilize baby bottles and is ultimately a question for your pediatrician.
What that looks like with real bottles
Here is the part the protocol does not cover, because it is not their job. Bottles differ enormously in how long that routine takes, and the difference is almost entirely parts and neck width.
| Feature | Why it matters at the sink |
|---|---|
| Number of parts | The single biggest factor. Every part is a thing to separate, wash, find and dry |
| Neck width | A wide neck takes a sponge and a hand. A narrow one needs a brush every time |
| Vent inserts | An extra piece that must come out, be washed, and be fully dry before reassembly |
| Screw threads | Where dried milk collects if a bottle is left standing. The reason to rinse straight away |
| Material | Glass stays smooth. Plastic scuffs, and residue sits in the scuffs |
A three part bottle and a five part bottle are not the same evening, and the gap compounds because you are not washing one bottle, you are washing a day of them. When people ask us which bottle to buy for easy cleaning, the answer is almost never about the material. Count the parts.
The second thing is rinsing straight away. Nothing in the CDC’s steps requires you to do this the moment the feed ends, and doing it anyway is the single practical habit that saves the most time. Milk that has dried into a screw thread or a valve does not rinse off, it has to be worked off. A ten second rinse converts that into nothing.
The wide neck argument, honestly
Some makers say their wide-neck bottles need no bottle brush, just a sponge. In our experience that is fair for the body of the bottle and not for everything else.
A wide neck genuinely does let you get a hand and a sponge inside, and it is the reason wide-neck bottles are faster to wash. But nipples still need something that gets inside them, and any vent part needs its own attention. So the honest version is that a wide neck removes the need for a brush on the largest part, not on all of them.
If you are choosing bottles partly on cleaning, that is an argument for wide over narrow, and a bigger argument for fewer parts over more. We ranked the ones we feed with on exactly that basis in best baby bottles for formula feeding.
Why bottles start to smell, and what it means
A clean bottle that still smells of milk is telling you something, and it is usually not that you washed it badly.
Residue sits where a brush does not reach. On a plastic bottle, that increasingly means the scuffs, because every scratch inside a plastic bottle is a place a sponge passes over rather than into. That is a process that takes months, which is why nobody warns you about it in week one.
Glass does not do this. It does not hold a milk smell, does not stain and does not scuff, which is the least glamorous and most useful argument for it. We set out the full trade, including what glass costs you, in glass vs plastic baby bottles.
If a plastic bottle has started to smell or has gone cloudy and a proper wash is not fixing it, the question has stopped being how to clean it. That is covered in how often should you replace baby bottles.
Drying is a real constraint, not an afterthought
The CDC’s instruction to air dry rather than towel dry has a practical consequence people do not plan for: a washed bottle is not an available bottle for a while.
Wide-neck bottles hold water, vent parts hold water in places you cannot see, and a full rack takes longer than you think. This is the actual reason a household that owns technically enough bottles still runs short at the wrong moment, and it is why our answer on how many baby bottles you need includes a buffer rather than matching the number of feeds exactly.
Stand things upside down or on an angle where you can, give the small parts their own space rather than nesting them, and start the wash earlier in the evening than feels necessary.
The things we got wrong
Leaving bottles in the sink until morning. It does not save time, it moves it, and it moves it to the least convenient possible moment.
Using the family dish brush on bottles. The CDC’s guidance is a basin and brush used only for feeding items, and once you have a dedicated set it is no harder.
Towel drying to speed things up. It is explicitly what the CDC says not to do, and we did it for a while before reading the guidance properly.
Buying a bottle with a vent insert without thinking about the sink. It is a perfectly good bottle and the insert does what it claims. It is also a small part that has to come out, be washed and be completely dry every single time, and that is a decision you make once and live with daily.
Where we landed
Follow the CDC’s steps, because they are free, short and written by people whose job this is. Rinse everything the moment the feed ends, which is the one habit that makes the rest quick. And when you are choosing bottles, count the parts, because that is what you are really choosing when you choose a bottle for cleaning.
If sterilizing is the question rather than cleaning, we cover what the CDC and AAP each say in how to sterilize baby bottles.
Frequently asked questions
How do you clean baby bottles properly?
The CDC's guidance is to clean feeding items after every use and at least daily. Wash your hands with soap and water for 20 seconds, take every part off the bottle, rinse the parts under running water, then wash either in the dishwasher or by hand in a basin kept only for feeding items. Air dry on a clean towel without rubbing anything dry, then store the reassembled bottles somewhere closed and clean. That is their protocol, and it is the one we follow rather than one of our own.
Can you put baby bottles in the dishwasher?
Most bottles are dishwasher safe, and wide-neck glass and plastic bottles usually specify the top rack. The CDC says to separate all the parts first and to put small items such as nipples, rings and valves in a closed-top basket or mesh laundry bag so they do not end up in the dishwasher filter. If your dishwasher runs hot water and a heated drying cycle, the CDC says a separate sanitizing step is not necessary.
Do you need a bottle brush?
It depends on the neck. Narrow bottles need one, because nothing else reaches the bottom corners. Wide-neck bottles are the reason some makers say a sponge is enough, and in our experience that is fair for the body of the bottle. You still want a small brush or teat brush for nipples and for any vent parts. Whatever you use, the CDC says to rinse the brush and basin after each use, air dry them, and wash them every few days.
How often should you wash baby bottles?
After every feed, and the CDC says to clean feeding items at least once daily. Leaving a used bottle until later is the thing that turns a two minute job into a scrubbing job, because dried milk in a thread or a valve does not simply rinse off. That is a practical point rather than a health one, and the health side of it belongs with your pediatrician and the CDC.
Why do baby bottles smell even after washing?
Usually because the residue is somewhere the brush is not reaching, and usually that is a scuffed plastic surface, a screw thread or a vent part. Glass does not hold a milk smell at all, which is one of the honest arguments for it. If a plastic bottle has started to smell or cloud and washing is not fixing it, that is the bottle telling you it is near the end of its life.
Do you have to dry baby bottles before storing them?
The CDC says to let items air dry thoroughly and specifically not to rub or pat them dry with a dish towel, because that can transfer germs onto the clean item. Stand them on a clean, unused towel or paper towel, leave them, then put them away reassembled in a closed cabinet. Drying time is also a real constraint on how many bottles you need in rotation.